OK - I've done it. Here's the process involved in putting an inner tube from a bike onto a Hermes 3000 platen.
First, go to the very helpful and detailed
Life in a Typewriter Shop post by Tom Furrier on how to remove & reinstall the platen from the Hermes. Read his intructions very closely - it can be an easy removal but you need to be careful.
 |
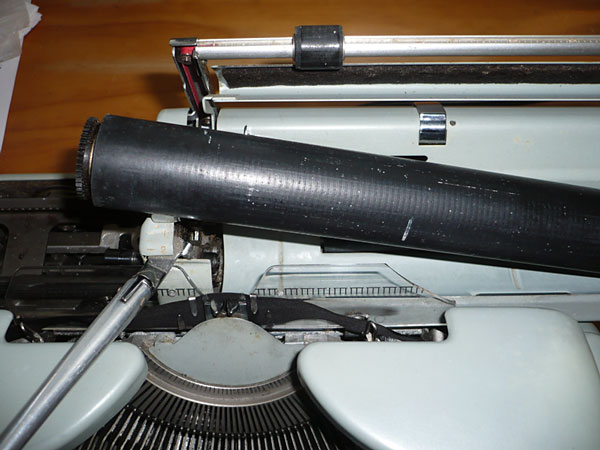
| Remove the platen as per Tom's instructions. |
Next: find an inner tube that roughly matches the diameter of the platen. I went to a few local bike shops and they were more than happy to give a bundle of used tubes from their workshop. Honestly, they replace many of these every day and the just bin them. Some of them will be fat and unusable (mountain bike tubes) and some just too narrow (the skinny race bikes).
The tube I ended up using was from a BMX-sized wheel, and just a fraction narrower than the platen is wide:
and cut it to rough size. Now, the outside of the tube has all the moulding marks on it, so I turned the tube inside out. The inside is dusted with fine talcum, which I wiped off with a damp cloth. Pull the tube over one end of the platen and work it all the way down. Odd little job... wrangle it and stretch it. Shout at it. But you'll see if it's on straight and even.
Once you're done, trim off the excess from the ends.
And fit it all back in the machine! Now, the Hermes actually has a good millimetre or more wiggle room in the platen housing and the feed rollers, so fortunately it all fits. The tube is maybe a half millimetre thick - so a lucky fit. Wrangling the platen back in to the side supports is a tricky thing and read Tom's post very carefully. Everything can fall out of place very easily. I know because it did!
Nearly there!


Awesome! I have so many platens and feed rollers in need of recovering, so any tips are great. I have been thinking about finding a lathe and a grinder and doing a bit of it myself...but just have tot get up and do it!
ReplyDeleteThanks for sharing this. A quick, (semi) easy solution to a hard platen. Nice
Oh yeah! Excellent work!
ReplyDeleteWow. I was skeptical, but you've proved that it can be done. I will add this to my typewriter repair tips.
ReplyDeleteThat's astounding. I've a 3000 with the top-of-the-caps issue and a rock-hard platen. If I work up the nerve to disassemble the platen, I'll seriously consider this. There's a bike shop just a block from my home. Kismet!
ReplyDeletebrave! and evidently talented!
ReplyDeleteway to go.
i looked into getting a lathe ... the ones i looked at were thousands of dollars. like $4k was the average price. so i guess ill either go this inner tube way or buy a tube of rubber or just send it out to be reconditioned
i must say, your successful rendering has given me a bit of confidence to attempt this myself
Just thinking.... Just thinking... Are or were you able to roll back the tube onto itself? I'm thinking about how to stop the slipping. I used to use a spray adhesive when screen printing, and I'm thinking - roll beck the tube half way, spray the platen, roll it back down again - and repeat on the other side.
ReplyDeletethanks for the comments folks. I realise now that it's so easy, it almost doesn't need pictures.
ReplyDeleteScott - yes, because the tube was pretty close in diameter, I could still stretch it back over itself. I thought about using a gentle or bike-repair glue to lock it onto the platen (or just at the ends), but really there's no need. They're pretty stretchy - but I didn't want to overdo it with a really thin tube; I reckon a few hard full stops and there'd be holes in it. This one is a little chunkier than the race tubes, and feels robust.
And my neighbour has an old wood lathe that I might experiment with. Need a vernier caliper, and then look at some mounts.... hm ideas!
First, more typing on the machine.
I done it on my Hermes Baby. Found a way to fold the tube over the platen very easily without effort. Do not turn the tube inside out and leave the talcum inside! It will serve as lubricant to put it on the platen and when you have done it, it will be turned inside out on the platen automatically and then you remove the talcum!
ReplyDeleteSo first you fold the end of the tube *inside* itself, just a 1/4 inch inside, then put this (inside) folded end over the platen and drag the tube down like you would drag a condom. Yes, I know it is weird comparison, but it works this way very, very easy.
But on the end I found the result not satisfactory. Because the diameter of the platen now was one millimeter bigger than original platen and typing on it all the types cut the paper. The type "o" would cut the paper so clean it would fall out of the paper leaving a hole there! The reason is that now the type bars strike on the platen *before* they strike with their "noses" on the segment and this is bad. The noses of the type bars must touch the segment at the same time when the ends of type bars (the types) touch the platen. If there is a misalignment they will cut holes in the paper. So you need a lathe to do it properly.
I wanted to add, that with this method I managed to put six (!) tubes on a single platen because they are very stretchable.
ReplyDeletemattam - yes - the condom analogy is apt and rubbery - but you've saved me having to use it! Also - the extra width is definitely an issue if the platen compartment is tight. I'm thinking of trying the experiment again with a Remington, and this time shaving off a mm or so before applying the rubber (...er...). Just have to talk my neighbour into letting me use his lathe. I got some vernier calipers just for that job. But the results - I'm very happy with it - the impressions are much better, it's got a softer/gentler type feel, it adds something to the Hermes experience.
ReplyDeletecheers, rino
I read now your answer and my last comment of applying six rubbers on each other and wonder what I was thinking writing this. Because now I ask myself if applying six rubbers - you know where - would give more pleasure to girls when making love with them ;-) :-DD
ReplyDeleteAnyway, I wonder if a tube will stand the test over time and you will not cut holes in it. Do you have some experience with this already? How robust is it? And you did not have any problems with cutting through the paper when writing on the tube?
I forgot to mention: the issue with bad impressions on the tops of the letters can be very easily adjusted without going into the trouble of renewing the platen. A typewriter has four screws to make this adjustments. Two screws below the ribbon capstan on the left and two below the right capstan. Sometimes they are located below the platen on the left and on the right. They are limiting the shift movement of the carriage and with them you can align the base line of small letters and capitals, so they write on the same base line (compare "H" with "h"). So if the tops of the letters are missing, so this means that you have to move the carriage up a little, both for lower case letters and the caps. But you have to loosen the counter nuts of those screws first with a 6mm wrench, then adjust with a fine screwdriver, check it and tighten the counter nut again. Be careful with tightening of the nut because you can easily break the screw if you use to much force. They are tiny old screws but luckily you can buy them at a local hardware store if you need replacement. It is an easy task if you can reach the screws. Usually you have to unscrew and put off the outer shell of the typewriter to reach them. And then checking if the left side is at the same level as the right side! To make this sure you have to press the left shift key, hit the "H" and then press the right shift key and hit the "H" again and check if they are on the same line. This can require a lot of patience but is doable. Sometimes you can reach only a compromise between the tops and the bottoms. Check for example the top of the "W" and the bottom of "g" if you are happy with both of them.
ReplyDeleteOf course with renewing the platen you will have even better impressions but I think if you do not adjust this screws at all, even with a new platen you will still have some of the tops missing.
Hi!
ReplyDeleteI am new to your site. But really take pleasure in it. Your post is quite informative, I just to add in your post Circular Technologies is an established US manufacturer of Timing Pulley, Timing Belt pulley, Roller assembly, bearings and Urethane Rollers. For more info just click the link.
Thanks!
thanks full information provides your blog
ReplyDeleteThapar rubber industries (a unit of perfect sales)